Built it in WealthNav
Creating the Action Lines is also shown in the video from the Basic Concepts Tutorial. I will go through an example of one creation and connection of points of an Action Line. However, whats important to note about these actions is their configuration settings are important, and different (and need to be explained properly), so I will go through each Lines configuration settings and explain why they are configured the way they are.
Action Line #1
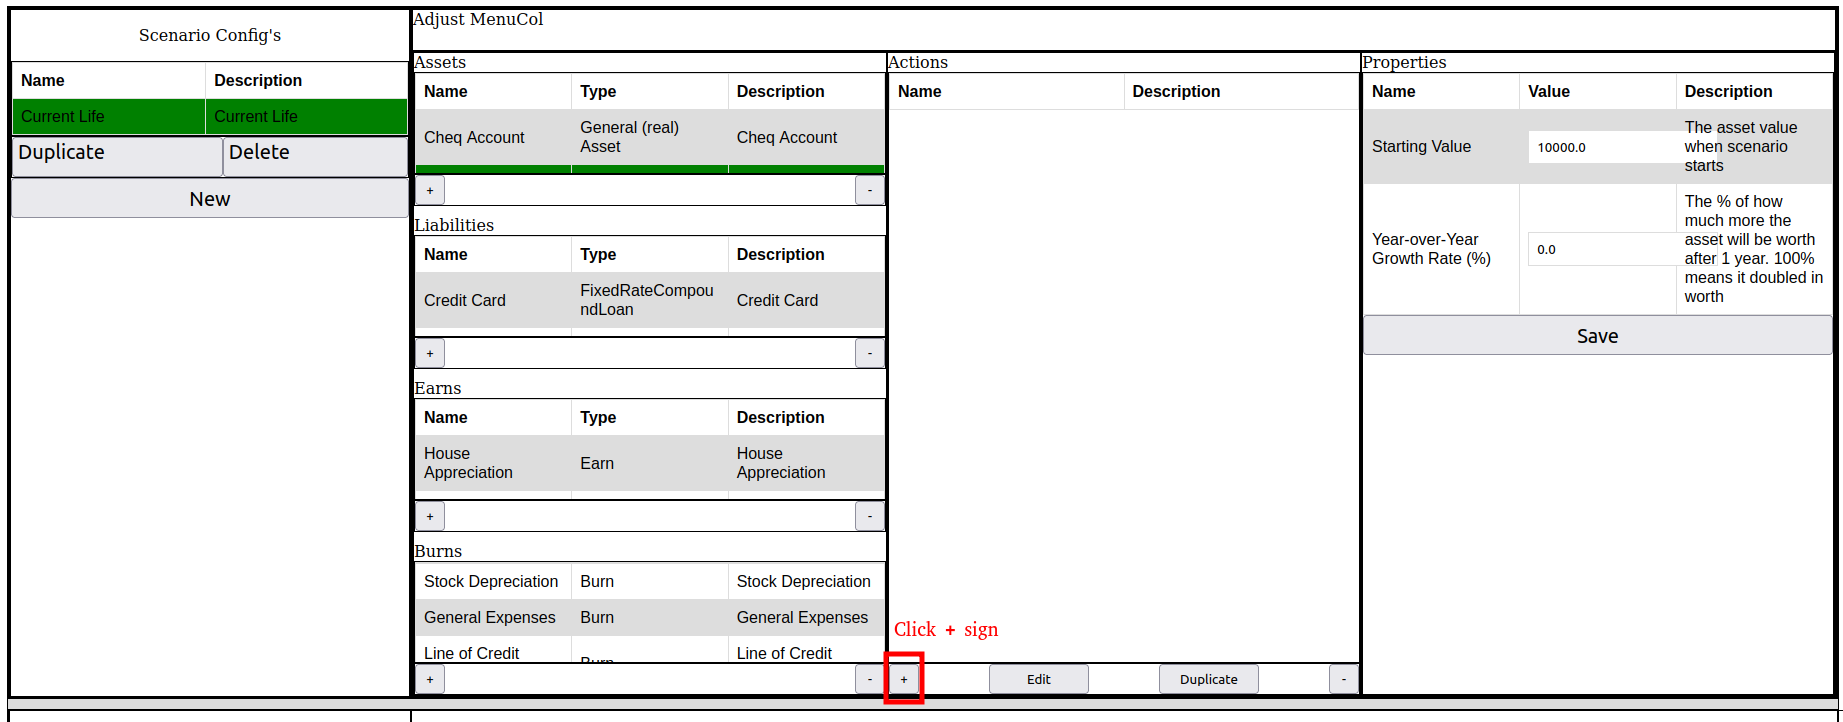
So, Let’s begin by working through the creation of the Action Line #1. First, we press the + sign for the Actions.
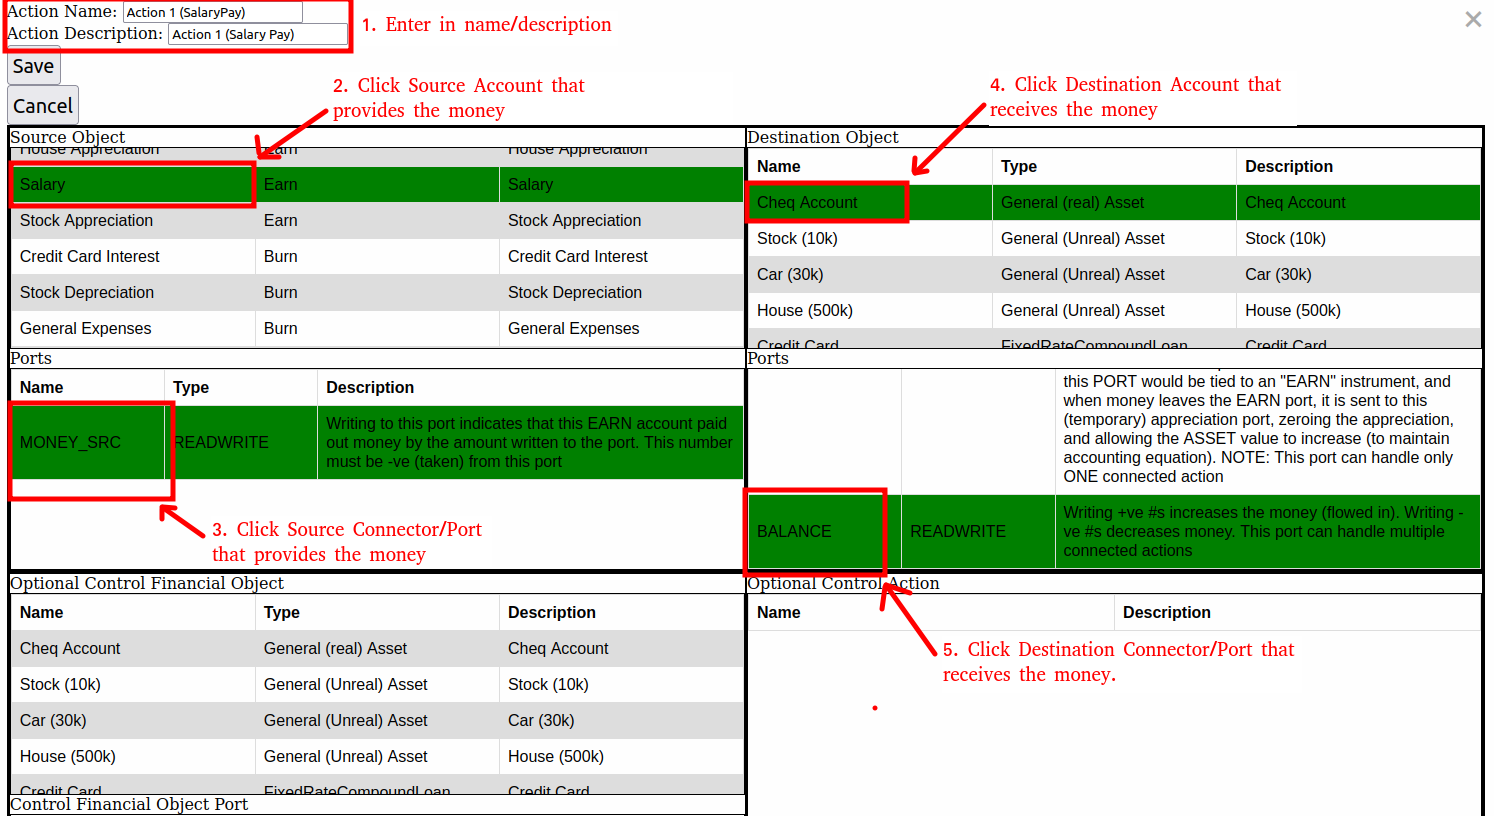
Now, we enter a name for the Action. I like to include the Action number so I don’t loose track of which actions are done or what they involved. Also select the source instrument and Connector/Port (which will be providing the money), and the destination instrument and Connector/Port (which will be receiving the money).
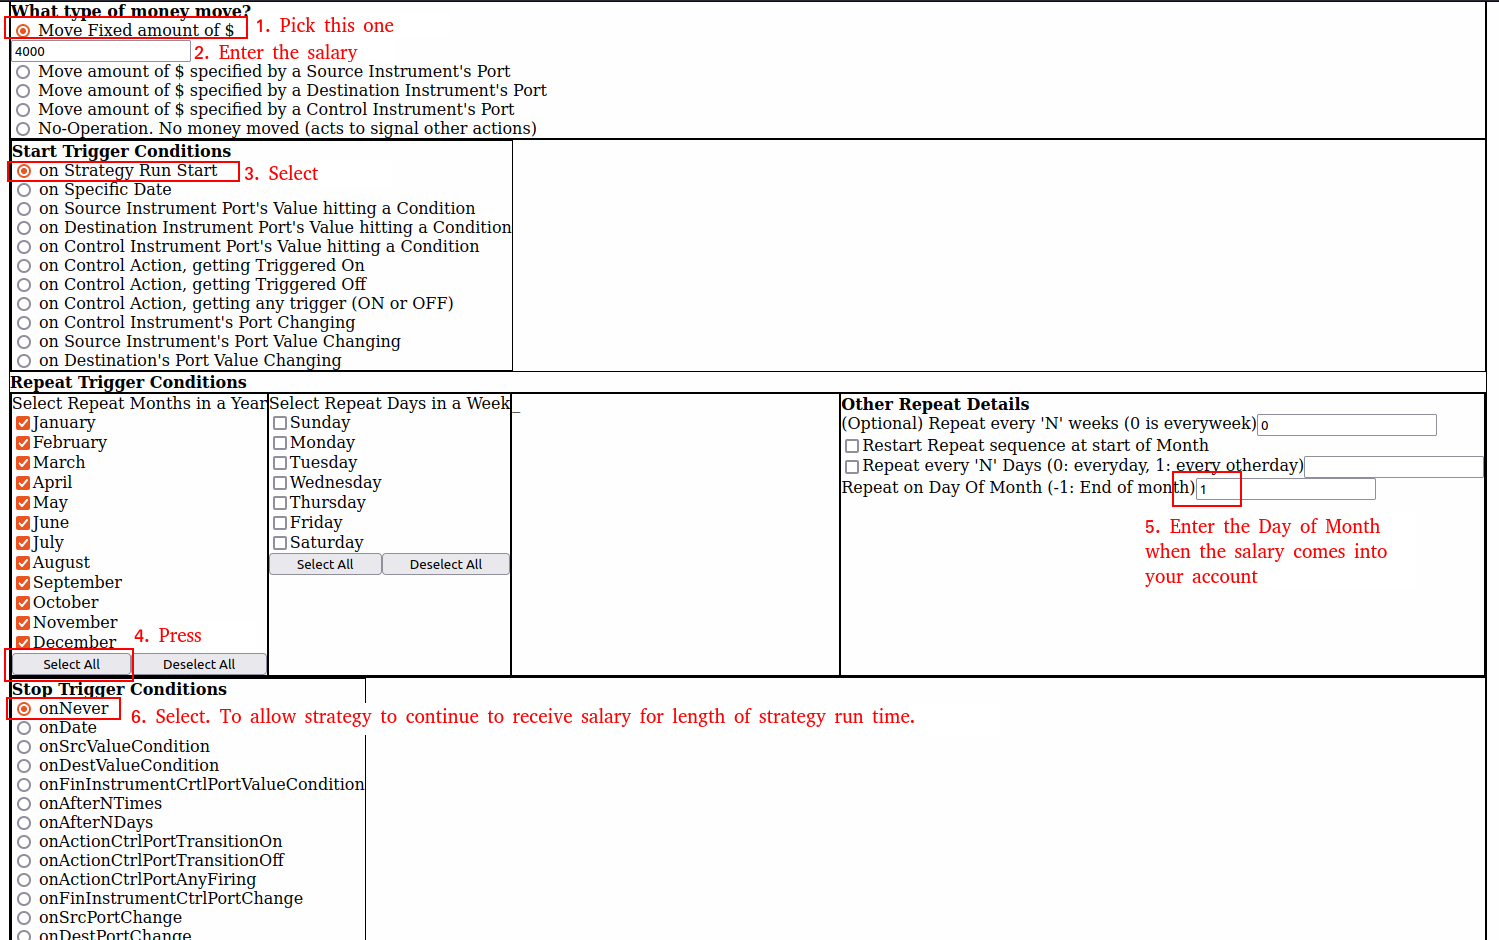
Now, scroll down and fill out how much money is moved (4000 for the salary), and how often it should move (once a month, every month when the strategy starts and never ending), as shown here:
Finally, scroll back to the top and hit Save. Now we have our first Action (line) complete. (Action #1).
Now, we do this for the remaining 19 actions, where we configure the source/destination ports according to the financial picture we described and drew on the previous page. The remaining portion of this article will describe any specific configuration settings or advanced controls that are needed, so that the WealthNav implementation can be completed.
Action #2 (Stock Appreciates)
Source/Destination:
As shown in our financial picture on previous page, this should have the Source Object/Port as the “EARN Stock Appreciation” Instrument and its only “MONEY_SRC” port, since it provides the source of money for the Stock appreciation. For the destination, it should be: “ASSET Stock” Account (and its Port, APPRECIATION) since it will be receiving the money that is being given to it from the “EARN Stock Appreciation” account.What type of money move:
The appreciation amount depends on what the Asset/Appreciation port calculates. What’s need is WealthNav can READ this amount and use it to control how much money is taken from the Source object (the attached Earn account). To do this, select: “Move amount of $ specified by a Destination Instrument's Port”Start Trigger Conditions
The appreciation amount gets calculated by the Stock Asset Account, so we can just start trying to move the appreciation amount when the strategy starts. If no appreciation is available yet, it will move $0.00 (so nothing). So, select: “on Strategy Run Start” option, and it will start trying to calculate the appreciation the moment the strategy starts.Repeat Trigger Conditions
This is how often the appreciation should be calculated. The Asset Account object calculates appreciation at the end of the year with the balance at the end of the year. So, we can set a single end-of-year trigger or just tell it to repeat every month. On the month the appreciation is calculated it will appear in the Appreciation port/connector of the Stock Asset, and this Action Line will see it on the next-month repeat trigger, at which point the Appreciation amount will be moved according to the source/destination. So, select all the months and pick the 1st or 2nd of the month for the appreciation to be added in. (I try to use different days of the months for triggers to fire, so that I can see the ups-and-downs of each trigger influencing the cash-flow and net-worth graphs, which tells me the triggers are working).Stop Trigger Conditions
This is when the appreciation should stop. Since we want to make sure the stocks that we own at any given point in time appreciate according to our settings for the specified time-window of our strategy run, we just pick: “onNever”.
Don’t forget to hit SAVE back at the top.
Action #3 (Stock Depreciates)
Source/Destination:
As shown in our financial picture on previous page, this should have the Source Object/Port as the “ASSET Stock” Instrument and it’s connector/port “Depreciation”, since it provides the source of money for the Stock depreciation. For the destination, it should be: “BURN Stock Depreciation” Account (and its only Port, MONEY_SINK) since it will be receiving the money that will never be seen again.
What type of money move:
The amount depends on what the Asset/Depreciation port calculates. Just like for the “appreciate” action above (action 2), WealthNav can READ the depreciation amount and use it to control how much money is taken from the Source object (the Stock Depreciation Port) to be sent to the attached Burn account. To do this, select: “Move amount of $ specified by a Source Instrument's Port”Start Trigger Conditions
The depreciation amount gets calculated by the Stock Asset Account, so we can just start trying to move the depreciation amount when the strategy starts. If no depreciation is available yet, it will move $0.00. So, select: “on Strategy Run Start” option, and it will start trying to calculate the depreciation the moment the strategy starts.Repeat Trigger Conditions
This is how often the depreciation should be calculated. The Asset Account object calculates depreciation at the end of the year with the balance at the end of the year. So, we can set a single end-of-year trigger or just tell it to repeat every month. On the month the depreciation is calculated it will appear in the Depreciation port/connector of the Stock Asset, and this Action Line will see it on the next-month repeat trigger, at which point the depreciation amount will be moved to the attached burn account. So select all the months and pick the 1st or 2nd of the month for the depreciation to be moved out.Stop Trigger Conditions
This is when the depreciation should stop. Since we want to make sure the stocks that we own at any given point in time appreciate according to our settings for the specified time-window of our strategy run, we just pick: “onNever”.
Don’t forget to hit SAVE back at the top.
Action #4 (Sold Stock)
This action should be configured to move some (or all) of the stock value from the Stock account back into the Chequing account (representing a sale of stock). Note, any stock still left in the Stock account continues its appreciation/depreciation calculations (just like it would occur in real life), because of the “onNever” stop trigger conditions we set in Action #2 and Action #3 (where the available stocks will appreciate/depreciate according to what the Stock Asset account calculates).
Source/Destination:
As shown in our financial picture on previous page, this should have the Source Object/Port as the “ASSET Stock” Instrument and it’s connector/port “Balance”, since it is where we want the money to be taken from (the source of money), representing the loss of stock value of the account (because we sold the stock). For the destination, it should be: “ASSET Cheq” Account (and its “Balance” Port) since it will be receiving the money that will we got for selling the Stock.
What type of money move:
This can be whatever you are trying to check (such as fully getting out of the market by selling all of your stock. or only partially, by selling off a fixed amount of your stock). For the sake of this example, we will configure it to move a fixed amount of money. This is done by selecting option “Move Fixed amount of $”, and entering an amount in the text-box. Let’s assume we sold 1000 for now.Start Trigger Conditions:
This can specify the timing/conditions of when we want the stock to be sold. In this case lets fix a hard date in the future. Do this by selecting “on Specific Date”, and select a date in the future. I’m going to pick 1 Feb 2035 (roughly 10 years from article writing).Repeat Trigger Conditions:
In this case lets assume we only want to a 1-off sale, so essentially we don’t have any repeat trigger conditions. We can just leave this section blank.Stop Trigger Conditions:
This indicates when we want the Action to be deactivated. We don’t have any repeat conditions, and there is really only the 1 time (the 1 and only start-trigger condition) where we want it to fire, so we can select : “onAfterNTimes”, and type in a 1 in the box that it appears. (N in this sense means the “number of times”. e.g: “stop Trigger fires after # of times”)
Don’t forget to hit SAVE back at the top.
Action #5 (Buy Car)
This action represents when we take the car loan in exchange for the value of the car, which generally means “when you bought the car”. It’s a 1-off Action in this case, since you can only buy the car once, before selling it.
Source/Destination:
In order to fund the purchase of the car, in this example we needed to take a car loan. So the Loan's pay-out port is the source of funds that are taken. So for Source Object, we select the CarLoan, and for the Connector/Port, we select the “TAKEOUT_LOAN” (which represents the connector/port where the loan value can be taken from).
For Destination, the money needs to go towards to where the car’s value is held in WealthNav, that is the Asset: Car Account, and the “Balance” port is where we move in/move out the account value. So, set the Destination as the “Asset: Car Account” and the Connector/Port as the “Balance” Port. This will allow the loan amount to move out of the loan and into the Account that represents the value of the car.What type of money move:
The amount of money to move in this setting can be set in 2 ways. We could use a fixed-payment amount of 30k, or we could make the amount dependant on what amount of loan amount is available (which should be 30k), for the price of the car. Using the loan amount to set it though is a little nicer, since if want to adjust how much loan amount is used on the car we could adjust the Loan Properties rather than editing the action (for example if the car increased in value and we needed a bigger loan, you would need to adjust the loan amount and this action to match it. WealthNav won’t let an action take more money than is available than the loan configuration).
So to keep it adjustable, we will configure the action to take the loan’s avaiable amount. Select option “Move amount of $ specified by a Source Instrument's Port”. Since the Source Port (the “TAKEOUT_LOAN'“ Connector/Port), can also be read by WealthNav to tell you the available max-loan that can be taken out, based on the Loan Configuration settings.Start Trigger Conditions:
Let’s assume you bought/own the car when the strategy first starts, so you can just select “on Strategy Run Start”Repeat Trigger Conditions:
Since this is a 1 off event, there are no repeat conditions, so leave this section as is.Stop Trigger Conditions:
Like the other 1-off event described. We can turn this action off after 1 time. We do this by selecting “onAfterNTimes”, and specifying “1” in the text box that appears.
Don’t forget to hit SAVE back at the top.
Action #6 (Sell Car)
This action represents when we sell the car at some point in the future.
Source/Destination:
In the case of selling the car, we are now exchanging the value of the car asset for money (that likely ends up in our chequing account). In another way of looking at it: we loose the physical car (hence its retained value in the Car Asset account) because we just gave the keys to someone else, but in exchange for giving away those keys, we got money (which we hold in our chequing account). So, we need to setup our Source Account (which will be reduced in money) and our destination as the chequing account (which will increase in money).What type of money move:
Since we want to sell the car for its entirety of value, we can tell WealthNav to Read this “Balance'“ Port of the source account and move that amount. To select this we choose option “Move amount of $ specified by a Source Instrument's Port”Start Trigger Conditions:
In this case (for now), we don’t want to sell the car. We could change that at a later time to see the effect it has on our financial future, but for now we can just leave it off. Do this by selecting “on Specific Date” and set the date to sometime well into the future which we wont look at, such as: 100 years. I picked 1 Jan 2135Repeat Trigger Conditions:
Like the others 1-off’s, so no repeat conditions need to be set.Stop Trigger Conditions:
Like the others 1-offs, select “onAfterNDays” and type in 1 into the text box that appears.
Don’t forget to hit SAVE back at the top.
Action #7 (Car Depreciation)
Over time cars generally depreciate. In our example, we said the car depreciates about 10% every year from its previous years value (10% depreciation year-over-year). When we setup the Car Asset account, in the Configuration Properties column, we need to set the Year-Over-Year gain to: -10.0 to represent this depreciation. We also need this action to handle the account depreciation, similar to how we handled the Stock assets depreciation (Action 3), that way we make sure we correctly account for the car loosing its value over time.
Source/Destination:
Just like the Stock Depreciation, our Source is the Asset’s Depreciation Port. In our case we would set this to “Asset: Car” account and select its “Depreciate" Port. The destination is the Car Depreciation Burn account and its only port “MONEY_SINK”.What type of money move:
Same explanation as the Stock Asset Depreciation, so select: “Move amount of $ specified by a Source Instrument's Port”Start Trigger Conditions:
Same explanation as the Stock Asset Depreciation, so select: “on Strategy Run Start”Repeat Trigger Conditions:
Same explanation as the Stock Asset Depreciation, so check all the month boxes, and select a “Repeat on Day Of Month” number of 3 or 4 (to be different than the 1 or 2 used in Stock Asset Depreciate, so we can see the effects of depreciation).Stop Trigger Conditions:
Same explanation as the Stock Asset Depreciation, so select “onNever”
Don’t forget to hit SAVE back at the top.
Action #8 (Car Loan Payments)
Since we have an outstanding loan, we need to make regular payments to the loan to pay it off. These payments generally need to include the interest and the owed loan amounts. In a fixed-payment payback schedule, the payment amount is the same, but large enough to pay for the interest as well, so that the loan is paid back in a given time frame (for example 5 years). WealthNav’s “FixedRateCompound Loan” Liability handles figuring out this fixed-payment amount for you, so you don’t need to figure this out by hand. Here we will configure the action to do this.
Source/Destination:
To pay back the loan, money comes from the Chequing Account, and is sent the the Liability’s payment Port. So, we select the Source Object as: “Asset Chequing” account and the Connector/Port as the “Balance” Port (where the money will be taken from). The Destination in this case is the Car Loan Liability Account, and the Connector/Port is the “FIXED_PAYMENT” Port.What type of money move:
The FIXED_PAYMENT port (the destination port) can tell WealthNav the regular payment amount to take from the source account (chequing account). To configure this we select: “Move amount of $ specified by a Destination Instrument's Port”, as reading the fixed payment port tells WealthNav the size of the payment.Start Trigger Conditions:
Since the car loan/and purchase was configured to start on the day of the strategy, we can configure the start conditions here. Select “on Strategy Run Start”.Repeat Trigger Conditions:
The car loan likes comes out on the 1st of the month, end of month of middle of the month. Just so we can see the loan come out regularly in the cash-flow, we will select all the months and enter “15” on in the text-box labelled “Repeat on Day Of Month”Stop Trigger Conditions:
The loan should continued to be paid until there is no loan left and no longer (we don’t want to keep moving money from our chequing account into a loan that’s already paid). We can set this up by using a “control object”, and adding a condition. To configure this we first go back to the top and locate: “Optional Control Financial Object”, under this we select the Car Loan Liability Object, and under "Control Financial Object Port” we pick “LOAN_BALANCE”, which is the read-only port (that WealthNav can read), which represents the remaining owed loan balance.
Now, that we chose our controlling financial object, we need to select the Stop Trigger which uses this control object. Under “Stop Trigger Conditions” now select “onFinInstrumentCrtlPortValueCondition”. This option allows us to trigger the stop based on some value of the Control port (LOAN_BALANCE) hitting some value (like zero).
Next, in the text-box that appears (labelled: “Port Conditional Value”), we set a value of 0.01 (1 cent), and we select the radio button “Port Value is LESS THAN above Conditional value”.
Now, when the Control Port (which maintains the loan balance owed) hits a value less than 1 cent, we will trigger this stop-condition and the payments will stop being sent.
Why did we choose 0.01 and not 0.0 and the equal condition? This is because of rounding error. Sometimes the numbers are not perfectly rounded (out by half a cent or so), so we make sure we trigger when we are suppose to by being within a margin of a error (1 cent is pretty close).
Don’t forget to hit SAVE back at the top.
Action #9 (Car Loan Interest)
When a loan/liability is used, Interest is accumulated (or accrued), usually every day on the owed balance of the loan. However, even though the interest is accrued, it is not paid for every day. It is only paid for on the day when the fixed-payments come in. When a fixed payment comes, a part of that payment first goes to pay-off all the accumulated interest (since the last payment), and for any remaining amount of fixed payment left over, that pays off the loan balance (example: I have a loan balance of $550. I pay $100 on my loan, but for the month I owe $70 worth of interest. the $70 interest is paid, and I never see the money again, but the $30 goes to paying my owed loan balance, which is now $520 [550 - 30]). This means for every fixed-payment a portion of that payment money is lost and never seen again because it was used to pay this interest amount. That is why the Car Loan Interest Port needs to be connected to a Burn account, because that interest expense is like we just burned that amount of money (due to interest).
Now, when does this interest get sent to the Burn account? Well it really only gets “loaded” (into the Interest to burn Port of the Loan) when the fixed payment comes in. So we will configure our action to send this Interest to burn amount to the Burn account when the fixed payment comes in.
Source/Destination:
As seen in the financial Picture from the last section, our Source of Interest to burn is the Car Loan Liability Account’s INTEREST Connector/Port, so we select this as our Source Instrument and Port. The Destination will be the BURN: Car Loan Interest account and its only port, so we select that accordingly.What type of money move:
The INTEREST port can be read by WealthNav to tell it how much interest is to be sent, so we select “Move amount of $ specified by a Source Instrument's Port”, to control the amount of money we will send to the Burn account, based on the interest we read from the Loan’s INTEREST Connector/Port.Start Trigger Conditions:
In this case we want the Interest to move only when a fixed payment comes in. In this way this action is controlled by Action 8 (when it triggers, or fires on, a payment operation). So, first we must go back up to “Optional Control Action”, and select “Action 8 (Car Loan Payment)”. Now, back under “Start Trigger Conditions” we will want to select “on Control Action, getting Triggered On”, meaning when Action 8 (the payment) is triggered to pay. (triggered on), we want our action to occur to (after it). In this way we can “daisy-chain” different control actions based on other actions.Repeat Trigger Conditions:
Now, you might think we need to configure the repeat conditions to mimic those of Action 8, but that would be a bunch of duplication, since we are already being controlled by Action 8. Best thing we can do is not repeat and only fire once, waiting for a re-trigger of Action 8 (the loan payment), to re-trigger the interest-sent-to-burn account. So we leave this section blank.Stop Trigger Conditions:
For the Stop conditions, as mentioned above, we only want to run once before turning off (in wait for the next action 8 payment to re-trigger us). So we select “onAfterNTimes” and in the text box that appears we type “1”.
Don’t forget to hit SAVE back at the top.
Action #10 (House Down Payment)
Generally when we purchase a house, we have to pay a down-payment and make up the rest of the payment using a Mortgage. Here we configure a 1-off down payment for the house. This is just like other assets where we moved money from one asset to another, and is straight forward.
Source/Destination:
As seen in the financial picture in the previous section. Money needs to leave our chequing account (the source) and be sent to the Asset account representing the value of the House we own (the House Asset account). Do this by selecting the Chequing account, Balance Port as the Source object & Port. For the destination object and Port, select the Asset: House, and Balance Port.What type of money move:
Down payments are generally fixed amounts of money. In our example we assumed a 10% down payment of 500k which is 50k, so we select “Move Fixed amount of $” and in the related text box type: 50000Start Trigger Conditions:
Let’s assume we purchased the house on the start of the strategy run, so that date ranges don’t need to be configured during the strategy/scenario run. We select “on Strategy Run Start”Repeat Trigger Conditions
Since its a 1-off down payment, no repeat conditions need to be selected.Stop Trigger Conditions:
Since its a 1-off down payment, we only do this operation 1 time. Select “onAfterNTimes” and in the text box that appears type “1”
Don’t forget to hit SAVE back at the top.
Action #11 (Buy House)
This is very similar to Action 5 (Buy Car), so we will skip most of the explanation and get down to the configuration for sake of brevity.
Source/Destination:
Source Account will be the Mortgage Liability’s “TAKEOUT_LOAN” Port. Destination Account and Port will be: “Asset: House” and Port “Balance”. Since the loan of 450k will be taken to provide the required House Value to the house account.What type of money move:
Like Action 5, this amount is provided by the TAKEOUT_LOAN Port. Select “Move amount of $ specified by a Source Instrument's Port“Start Trigger Conditions:
Like the 1-off Action 5, we decided this house was purchased at the start of the strategy run. Select “on Strategy Run Start”Repeat Trigger Conditions;
Like the 1-off Action 5, there are no repeat conditions.Stop Trigger Conditions:
Like the 1-off Action 5, we select “onAfterNTimes” and enter 1 into the text-box that appears
Don’t forget to hit SAVE back at the top.
Action #12 (Pay Mortgage)
This is very similar to Action 8 (Car Loan Payments), so we will skip most of the explanation and get down to the configuration for sake of brevity.
Source/Destination:
Source Account will be the Chequing Account and Port will be the “BALANCE” port, since we will pay the mortgage from the chequing account. Destination will be the Mortgage Liabilities FIXED_PAYMENT Port.What type of money move:
As explained in Action 8, we select “Move amount of $ specified by a Destination Instrument's Port”Start Trigger Conditions:
Since we bough the house at the start of the strategy, just like we matched times for payment in Action 8, we do so here. So we select “on Strategy Run Start”Repeat Trigger Conditions:
As explained in Action 8, we select all the months, and pick a day-of-the-month for the mortgage to come out. I selected the 17nth a day when nothing else comes out (so we can see the change in chequing account balances). Type 17 in the “Repeat on Day Of Month” text-box.Stop Trigger Conditions:
As explained in Action 8. Back at the top under “Optional Control Financial Object” We select the “Mortgage” Liability, and for “Control Financial Object Port” we select “LOAN_BALANCE”. Then back down at Stop Trigger Conditions, we select option: “onFinInstrumentCrtlPortValueCondition” and in the radio buttons that appear select “Port Value is LESS THAN above Conditional value”, and in the text-box labelled “Port Conditional Value” we enter 0.01. This will cause the mortgage payments to stop occurring once the mortgage is paid off.
Don’t forget to hit SAVE back at the top.
Action #21 (House Appreciates)
This is very similar to Action 2 (Stock Appreciates), so we will skip most of the explanation and get down to the configuration for sake of brevity. Note: Make sure to configure the house asset account properties to have a year-over-year appreciation of the example amount (3%)
Source/Destination:
Source Account will be the House Appreciates EARN account and its only Port “MONEY_SRC”. The Destination will be the House Asset Account’s APPRECIATE Port.What type of money move:
As noted in Action 2, we select “Move amount of $ specified by a Destination Instrument's Port”Start Trigger Conditions:
We can start appreciation calculations on day 1 of the strategy running. So we select “on Strategy Run Start”Repeat Trigger Conditions:
As noted in Action 2, we select all the months and enter a day of the month. Lets pick the 5th. Enter 5 in text-box “Repeat on Day Of Month”.Stop Trigger Conditions:
As explained in Action 2, we can select “onNever”
Don’t forget to hit SAVE back at the top.
Action #13 (Mortgage Interest)
This is very similar to Action 9 (Car Loan Interest), so we will skip most of the explanation and get down to the configuration for sake of brevity.
Source/Destination:
Source Account will be the Mortgage Liabilities INTEREST Port. Destination will be the Burn Account: “Mortgage Interest” and its only Port (MONEY_SINK).What type of money move:
As explained in Action 9, we select “Move amount of $ specified by a Source Instrument's Port” because the Interest is held in the Mortgage Liability, waiting to be sent to a burn account.Start Trigger Conditions:
As noted in Action 9, we go back up to “Optional Control Action”, and here we need to select the Fixed payment for the mortgage (Action 12), to control when this interest action happens. Now, after selecting the Action 12 for “Optional Control Action”, we go back down to “Start Trigger Conditions” and select “on Control Action, getting Triggered On”Repeat Trigger Conditions:
As explained in Action 9, we do not have any repeat conditions, leave it blank.Stop Trigger Conditions:
As noted in Action 9, we only fire once then shut off. We select “onAfterNTimes” and in the text-box that appears we write in 1.
Don’t forget to hit SAVE back at the top.
Action #14 (Credit Card Charges)
This is very similar to Action 5 (Buy Car), except instead of transferring the loan value to an Asset account that retains value, since these Credit card charges are related to expenses (or items we never expect to get the money back from), we tie the loan amount to a BURN account (Representing the money we spent and never recover, but have to pay back). This is an important reminder, anytime you spend money on credit, and you don’t expect to get that money back, think of the price as the price you purchased the item for + the credit card loan interest you end up paying, as the price of the item you purchased since, in the end, you need to pay that loan back on top of the original price.
Source/Destination:
Source Account will be the Credit Card Liabilities TAKEOUT_LOAN Port (which is where we are getting the credit card money from). Destination will be the General Expenses BURN account’s MONEY_SINK Port which represents all the general expense items you bought with your credit card, that do not retain any value (example: hair cuts, groceries, utilities, that were charged to your credit card and are yet to be paid back).What type of money move:
We assume the money owed is set by the available credit liability loan amount, so we select “Move amount of $ specified by a Source Instrument's Port” as we’ve done for the other Liabilities.Start Trigger Conditions:
We assume that the money was owed upon start of the strategy, so we select “on Strategy Run Start”Repeat Trigger Conditions:
This is a one-off action so no repeat conditions. Leave as is.Stop Trigger Conditions:
Since this is a 1-off event, we select “onAfterNTimes” and in the text-box that appears type 1
Don’t forget to hit SAVE back at the top.
Action #15 (Line of Credit Charges)
This is very similar to Action 14 (Credit Card Charges), so we will skip most of the explanation and get down to the configuration for sake of brevity.
Source/Destination:
Source Account will be the Line of Credit Liabilities TAKEOUT_LOAN Port. The Destination will also be the General Expenses BURN account’s MONEY_SINK Port.What type of money move:
Exact same as Action 14. Select “Move amount of $ specified by a Source Instrument's Port”Start Trigger Conditions:
Exact same as Action 14. Select “on Strategy Run Start”Repeat Trigger Conditions:
Exact same as Action 14. Skip this section.Stop Trigger Conditions:
Exact same as Action 14. Select “onAfterNTimes”, and enter 1 in the text-box that appears.
Don’t forget to hit SAVE back at the top.
Action #16 (Pay Credit Card)
This is very similar to Action 8 (Car Loan Payments), so we will skip most of the explanation and get down to the configuration for sake of brevity.
Source/Destination:
Source Account will be the Asset Chequing Account’s Balance Connector/Port. The Destination will be the Credit Card Liabilities “FIXED_PAYMENT” Connector/Port.What type of money move:
As noted in Action 8, this should be “Move amount of $ specified by a Destination Instrument's Port”Start Trigger Conditions:
Just like Action 8, we assumed the credit card paid out the expense (incurring the credit card debt) when the strategy started. So we select “on Strategy Run Start”, to start paying the debt back from when the debt was taken (at start of strategy run time-frame)Repeat Trigger Conditions:
We likely pay back this loan every month, so select all the months and pick a day of the month(I used the 14nth, since not used by other actions). So enter 14 in text-box “Repeat on Day Of Month”Stop Trigger Conditions:
As explained in Action 8, we configure the credit card to stop being paid once its totally paid off. We, go back to the top and under “Optional Control Financial Object”, we select the “Credit Card” Liability, and for Port, the read-only “LOAN_BALANCE” port. Then, go back down to “Stop Trigger Conditions” and select “onFinInstrumentCrtlPortValueCondition”, and select radio button “Port Value is LESS THAN above Conditional value”, and in the text box “Port Conditional Value” enter value: 0.01
Don’t forget to hit SAVE back at the top.
Action #17 (Pay Line of Credit)
This is very similar to Action 16 (Pay Credit Card), so we will skip most of the explanation and get down to the configuration for sake of brevity.
Source/Destination:
Source Account will be the Asset Chequing Account’s Balance Connector/Port. The Destination will be the Line of Credit Liabilities “FIXED_PAYMENT” Connector/Port.What type of money move:
As noted in Action 16, this should be “Move amount of $ specified by a Destination Instrument's Port”Start Trigger Conditions:
Just like Action 16, we assumed the Line of Credit paid out the expense (incurring the Line of Credit debt) when the strategy started. So we select “on Strategy Run Start”, to start paying the debt back from when the debt was taken (at start of strategy run time-frame)Repeat Trigger Conditions:
We likely pay back this loan every month, so select all the months and pick a day of the month(I used the 13nth, since not used by other actions). So enter 13 in text-box “Repeat on Day Of Month”Stop Trigger Conditions:
As explained in Action 8, we configure the Line of Credit to stop being paid once its totally paid off. We, go back to the top and under “Optional Control Financial Object”, we select the “Line of Credit” Liability, and for Port, the read-only “LOAN_BALANCE” port. Then, go back down to “Stop Trigger Conditions” and select “onFinInstrumentCrtlPortValueCondition”, and select radio button “Port Value is LESS THAN above Conditional value”, and in the text box “Port Conditional Value” enter value: 0.01
Don’t forget to hit SAVE back at the top.
Action #18 (Credit Card Interest)
This is very similar to Action 9 (Car Loan Interest), so we will skip most of the explanation and get down to the configuration for sake of brevity.
Source/Destination:
Source Account will be the Credit Card Liabilities INTEREST Port. Destination will be the Burn Account: “Credit Interest” and its only Port (MONEY_SINK).What type of money move:
As explained in Action 9, we select “Move amount of $ specified by a Source Instrument's Port” because the Interest is held in the Credit Card Liability, waiting to be sent to a burn account.Start Trigger Conditions:
As noted in Action 9, we go back up to “Optional Control Action”, and here we need to select the Fixed payment for the Credit Card (Action 16), to control when this interest action happens. Now, after selecting the Action 16 for “Optional Control Action”, we go back down to “Start Trigger Conditions” and select “on Control Action, getting Triggered On”Repeat Trigger Conditions:
As explained in Action 9, we do not have any repeat conditions, leave it blank.Stop Trigger Conditions:
As noted in Action 9, we only fire once then shut off. We select “onAfterNTimes” and in the text-box that appears we write in 1.
Don’t forget to hit SAVE back at the top.
Action #19 (Line of Credit Interest)
This is very similar to Action 9 (Car Loan Interest), so we will skip most of the explanation and get down to the configuration for sake of brevity.
Source/Destination:
Source Account will be the Line of Credit Liabilities INTEREST Port. Destination will be the Burn Account: “Line of Credit Interest” and its only Port (MONEY_SINK).What type of money move:
As explained in Action 9, we select “Move amount of $ specified by a Source Instrument's Port” because the Interest is held in the Line of Credit Liability, waiting to be sent to a burn account.Start Trigger Conditions:
As noted in Action 9, we go back up to “Optional Control Action”, and here we need to select the Fixed payment for the Line of Credit (Action 17), to control when this interest action happens. Now, after selecting the Action 17 for “Optional Control Action”, we go back down to “Start Trigger Conditions” and select “on Control Action, getting Triggered On”Repeat Trigger Conditions:
As explained in Action 9, we do not have any repeat conditions, leave it blank.Stop Trigger Conditions:
As noted in Action 9, we only fire once then shut off. We select “onAfterNTimes” and in the text-box that appears we write in 1.
Don’t forget to hit SAVE back at the top.
Action #20 (General Expenses)
This is a pretty straight forward configuration. It represents the monthly expenses that are spent (the example said it was $1700 per month), on purchases we never expect to get back (as in its sent to a BURN/expense account since we never get that money back)
Source/Destination:
Since we will be paying these expenses from our Chequing account, we need to set the Source Account to the Asset Chequing Account and select the “BALANCE” Connector/Port. The Destination is the Burn account: “General Expenses” and its one and only Port “MONEY_SINK”, since we paid for the general expenses (like heat and groceries) and never expect that money back (as if it was lit on fire, or poured down the sink drain).What type of money move:
We said in the example a fixed 1700 would be used up every month, so we select “Move Fixed amount of $”, and in the text-box that appears we write: 1700Start Trigger Conditions:
Since these start coming out on a regular basis during the strategy run, we can select “on Strategy Run Start” to indicate that we start calculating this from the get-go of the strategy run time-frame.Repeat Trigger Conditions:
Since the charge comes out every month, select all the months, and specify a day of the month. I am using the 22nd because none of the other actions use it (so we can see its affect in the graphed results). So fill in “Repeat on Day Of Month” text-box with the number 22.Stop Trigger Conditions:
In this example, its expected that the monthly General Expenses charge will come out every month for the duration of the strategy run time-frame, so select “onNever”.
Don’t forget to hit SAVE back at the top.
Graph It!
Now, with all the actions configured we can try to Run the strategy and get a graph of our net worth over time and our real asset (chequing account balance) over time. First, enter in a “Start On” and “Stop On” date. I am running for 1 year just to see how it all plans out. So I select “20 Dec 2024” as start on date, and “20 Dec 2025” as the Stop on Date. Now select the checkbox next to your Strategy name “Current Life” and then click “RUN SCENARIO’s”, as shown below:
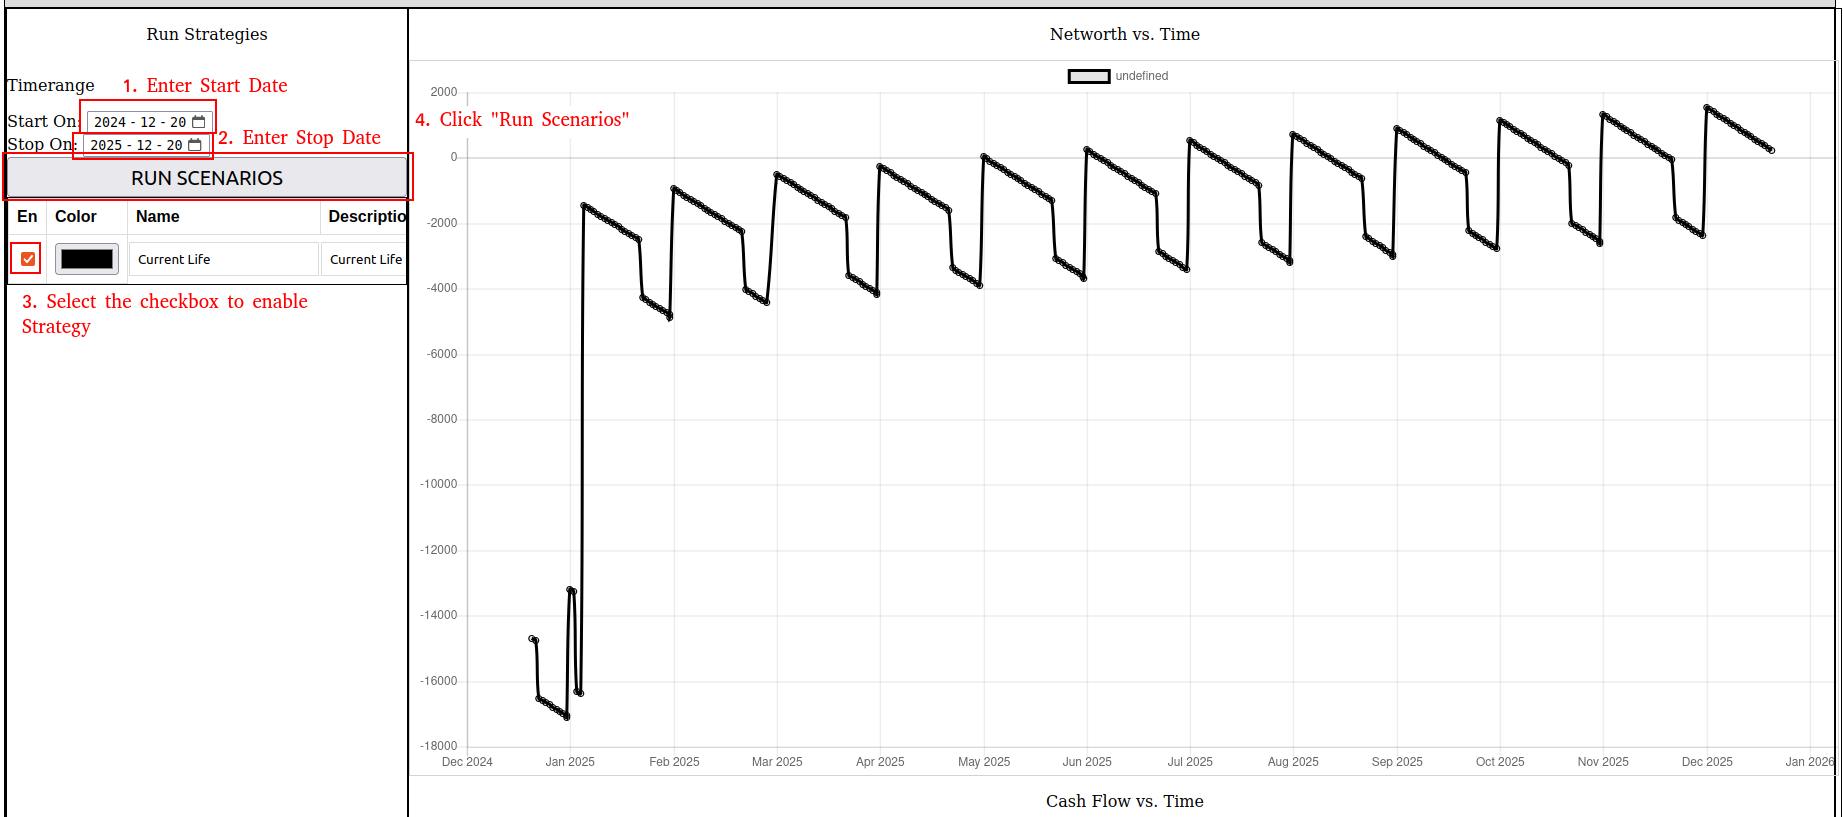
Now, notice the the large uptick in Net-worth on Jan 5th. If we look back through our actions we will see that this is due to the House Appreciating. The saw-tooth jagged edges shows us the loss in networth due to interest accumulating over time.
There you have it! Feel free to try to run the scenario for larger time frames and example the cash flow (or what your Chequing account [Real Asset]) Account balance is.
With this reference financial picture we can DUPLICATE it (in WealthNav), and experiment with or future based on new financial instruments, or changes in Payments. For example, to see how retirement would play out. Set the Salary to stop paying at some fixed point in time, but run the strategy for a longer timeframe. e.g: set Salary to stop paying on fixed date of 2045, but run strategy to 2065. How is the Networth and Cash-flow changed? What can you try planning now (and testing as a new financial object in WealthNav) to help cover the financial gap? This is an example of the power of WealthNav! Giving you eyes into the future, to let you play out possible financial scenario’s and strategies!