Let's Draw Your Financial Picture
Review
As noted in the Basic Concepts HowTo, lines connect between connectors on the Account boxes to eachother to identify how and where money flows. The settings configured for the action line, allows us to tell the program when, and how often and under-what-circumstances the money should move from the source (head of the action line arrow), to the destination (arrow end of the action line). For a review of this please click here
Working through the Example
To best illustrate how the lines should be configured-and-connected, let’s consider the example scenario we have been working through. Also consider the video from the “Basic Tutorial”, as it demonstrates many of the basic connections.
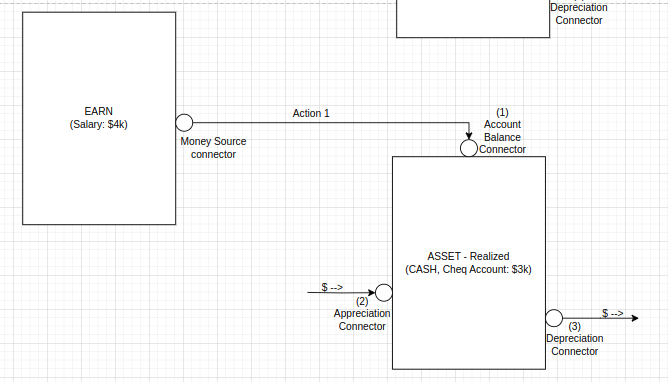
Working through the Example: The “Earn: Salary” Box
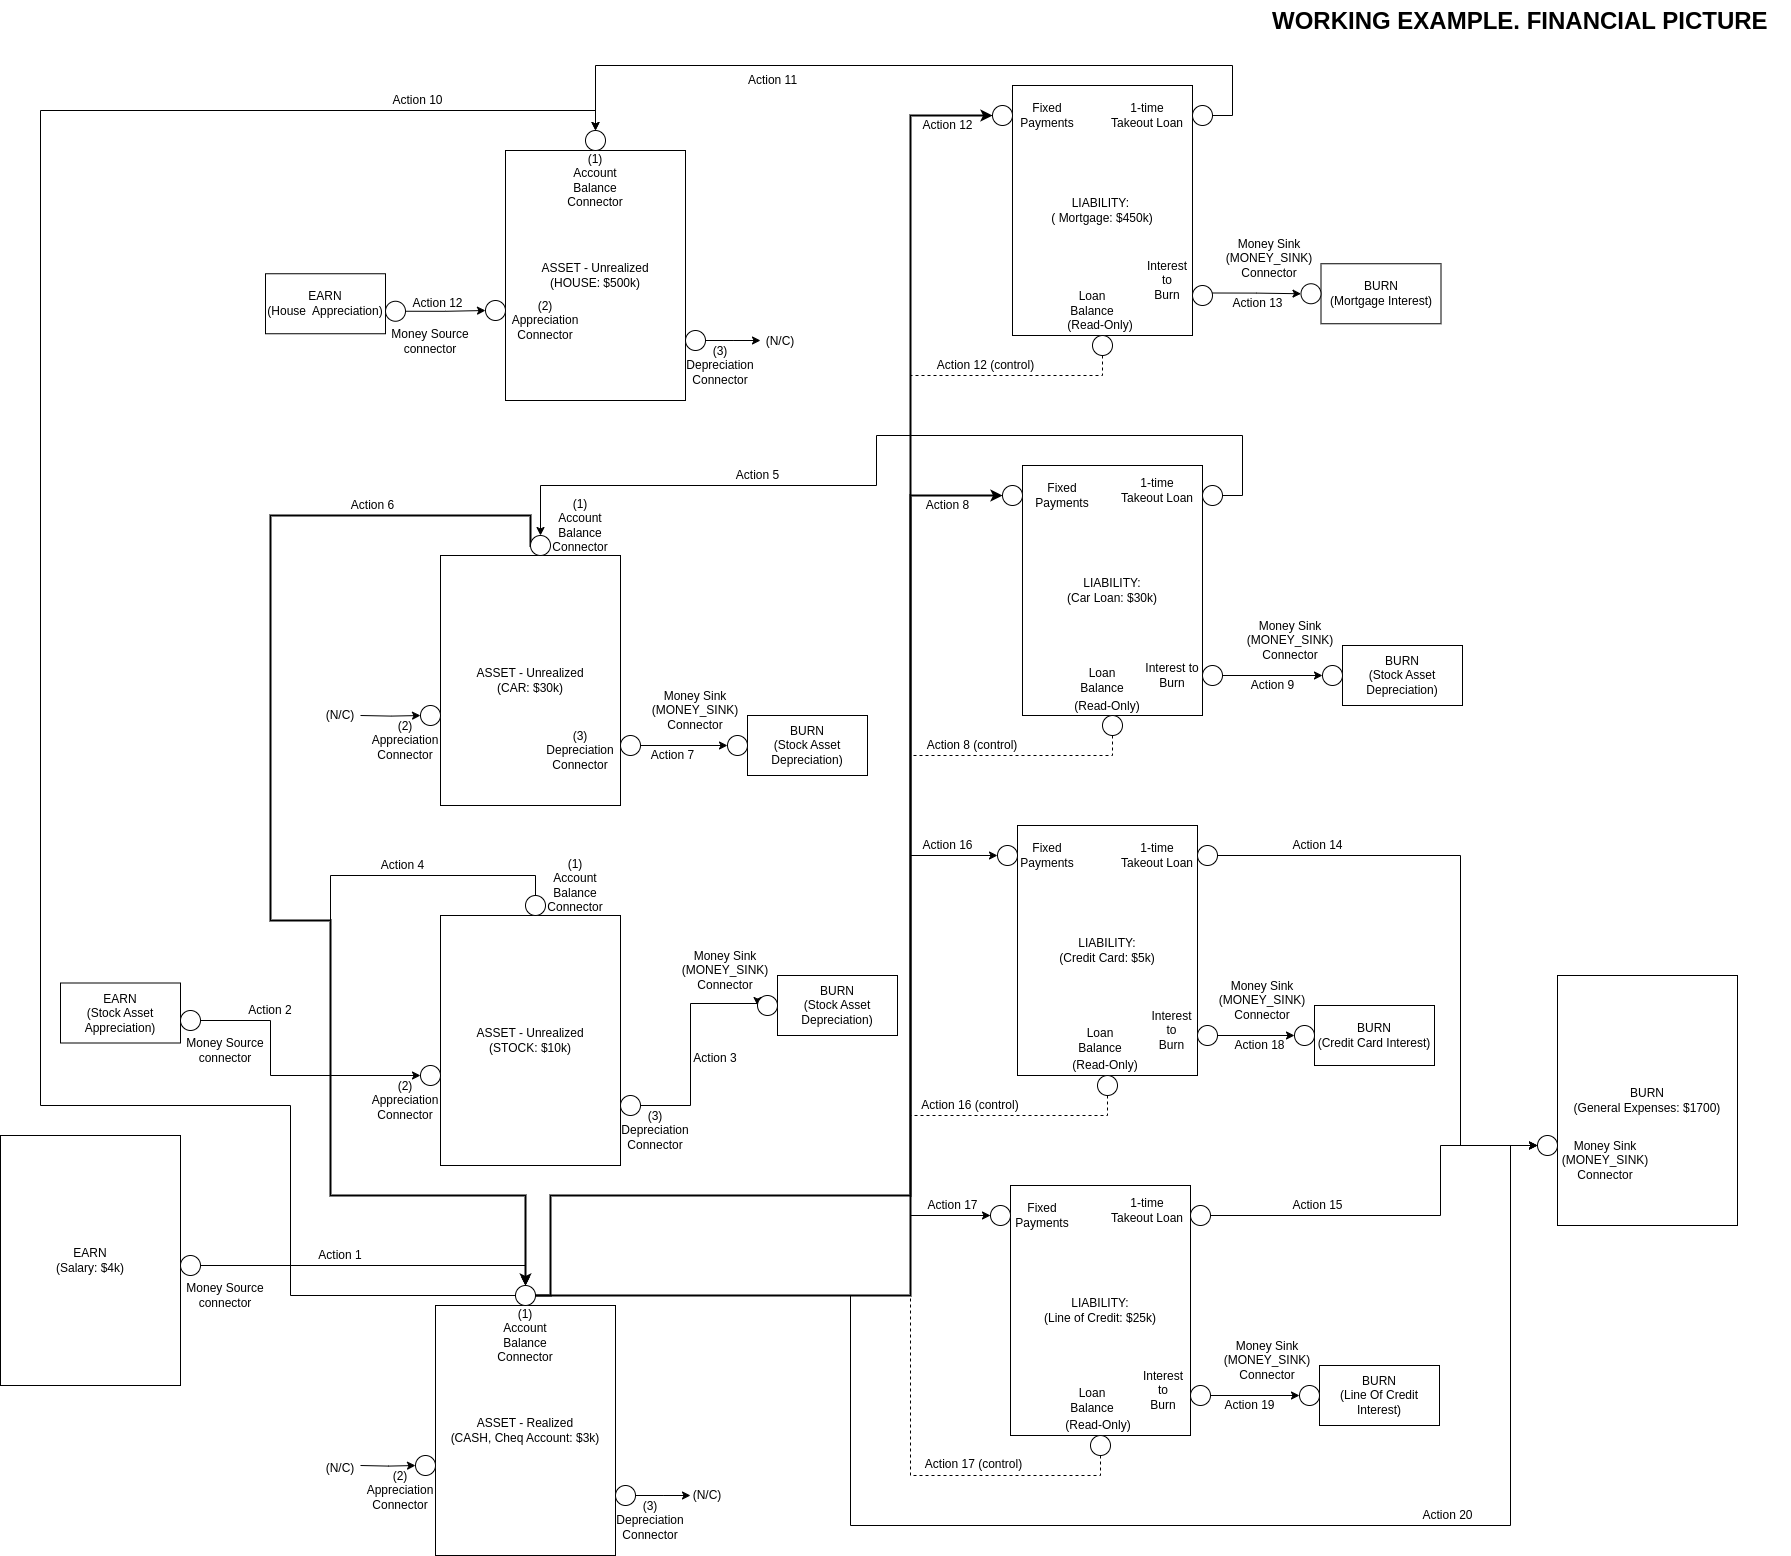
Notice the box contains one connector. This provides the place where “money would come out of” (like a faucet or a kitchen tap). Since this represents the Employer’s Payroll account (as the money flows out of your employers payroll account into your bank account), we would connect an Action Line from the Earn:Salary box connector, to the “Balance” connector on the Asset - Realized: Chequing Account Box. (as the money flows between those 2 connectors). E.g: The diagram on the right.
Notice: The chequing account doesn’t really appreciate or depreciate, so we can leave the Appreciation and Depreciation Connector/Ports unconnected for now.
Also Notice: We gave a number to the action line. This is useful for later on, when trying to input the specifics into Wealthnav, that way you don’t loose track of which action line you’ve configured.
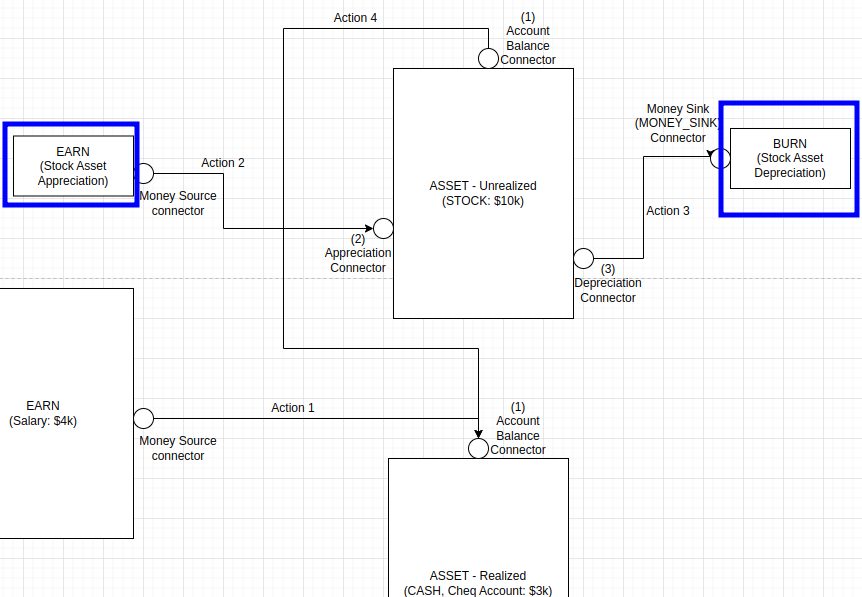
Next, we connect the Stock Asset.
Working through the Example: The “Asset: Stock” Box
In this example we have shown that the Stock Asset already has $10k worth of stocks in it. That can be quickly setup in the configuration Property for the Asset Account in WealthNav. However, if you are looking to plan for moving money into and out of the stock account you would need to determine where to move it to. One such location would be the Chequing account. If this were the case we would need a line between the Stock account Balance Port and the Chequing account Balance port (allowing us to tell WealthNav that money will be pulled from the Stocks and moved into CASH.) Let’s assume the user might want to do this at some point (such as in 10 years).
Next, we need to make an assumption about whether the stock will appreciate year over year or depreciate. Likely we may want to check conditions for both. This Year-over-Year appreciation/depreciation number is set in the Asset Account Configuration Properties in WealthNav.
However, we must also consider where the money comes from (on Appreciation), or where the money was lost (on depreciation). So, in this case we need to make 2 more accounts. 1 EARN account (for the Appreciation of the Stock Asset), and 1 BURN account (for the depreciation of the Stock Asset). Just think about it. When you sell something at a higher price than you bought it, who is paying you more? The buyer. That is basically the Earn-Appreciation account (the buyer who gave away their money in exchange for your stock), but to keep it easy, we just call it the “Earn: Asset Appreciation” account. So, lets draw in the 2 new accounts, and the 3 action lines.
Notice,
We drew 2 blue boxes around the 2 created accounts we needed (the Earn: Stock Appreciation account, and the Burn: Stock Depreciation Account).
We created 3 more actions:
Action 2: Ties the Earn Appreciation to the Appreciation Connector on the Stock Asset account (so the Asset Account will know where to get its source/money from)
Action 3: Ties the Stock Asset Depreciation Connector to the Stock Depreciation Burn account, (so the Asset Account will know where to direct the lost money towards. In this case this represents the buyer who gets our stock “on sale”)
Action 4: Ties the Stock Asset Balance Connector to the Balance connector of our Chequing account, so that we when we sell our stock, we can move the CASH we got for the stock sale, to an account that holds cash (not stocks)
Next, we consider the Car and related loan.
Working through the Example: The “Asset: Car” Account and “Liability: Car Loan” Account
Next up, we look at the Car Asset Account. Now, we have an interesting situation here: We also have a car loan liability box (which undoubtedly was used to purchase the car). Instead of handling these boxes separately it seems prudent to handle them together.
Next, consider that when the car was bought for 30k, we would have used the lump-sum of the loan to pay for the value of the car. This means there should be an action coming from the Loans “1-time takeout Loan” Connector/Port (a source of money, though its borrowed) that gets tied to the “BALANCE” Connector/Port of the “Asset - Unrealized CAR” Account, since this Balance Port will hold the value that represents the car’s value (labelled as Action 5).
Now consider this, will we ever sell the car? Or will we drive the wheels off of it and junk it? Given that car maintenance fee’s start to go up as the car gets older, lets consider that we might sell the car at some point later in the future. Now, where would the money go from the sell of that car? Likely to the chequing account. So we need another Action Line from the Balance of the Car Asset Account to the Chequing account, which will be configured for specifics around when the car can be sold (labelled as Action 6).
Next, let’s consider the fact the Car Asset depreciates over time (and, for the sake of this example, never appreciates), by -10% Year-Over-Year. This value must be configured in the Configuration Properties of the Car Asset Account in WealthNav, and since we lost some of the value we paid for the car (depreciation), we must tie the Car Asset Depreciation Connector/Port to a Burn account (labelled as Action 7)
Now, looking at the Car Loan, we tied in the 1-time-takeout port (the loan payout), but what about paying the loan back? and how do we deal with the interest?
First, to pay the loan back, we would likely be be taking money from our Chequing account and paying off the loan, so we would need to have an Action Line between the Asset Chequing Account’s Balance Connector/Port and the Liability Car Loan Account’s "Fixed Payments” Connector Port. (labelled as Action 8). What’s neat here is that any money flowing into the Fixed Payment port of the Car Loan Liability, will first go towards paying off any accumulated loan interest before having any leftover payment amount put on top of the owed loan amount (remaining principal), this is exactly how fixed payment loans work with the bank (which is important since we are modelling what the bank would do).
Now, when should we stop paying back the loan? When there’s no loan amount owing left! To configure this stop condition for our Action 8 line, we can use a “control Connector/Port”, which provides us a read-only input of the remaining loan balance. This is the purpose of the “Loan Balance (Read-Only)” Connector/Port of the Car Loan Liability Account. It can be tied into the Action 8 (for doing the fixed payments), to stop doing regular payments once the loan is fully repaid.
Now, finally, let’s talk about the Loan Interest. This loan interest, like depreciation of Assets, is an Expense (or a Burn.. We never get this money back), and just like we needed to send the depreciation amounts to a burn account, we also need to send the loan interest to a burn account. So lets create another Burn account and call it “Mortgage Interest” and connect an Action Line (labelled as Action 9) from the “Interest to Burn” Connector/Port on the Car Loan Liability Account, to the new Burn account we just created.
Now, the Liability Account keeps track of accumulated interest, but it can’t burn it to the Burn expense account until an actual fixed-payment comes in, so until we get payments we don’t have any interest to burn. Thankfully, just as we setup stop-controls for the fixed Payment, we can setup a start-control for the Interest-to-Burn Port (so that we only send the payed for interest to the connected burn account, when there has actually been a payment on the interest). Now let’s look at the picture of all this on the right.

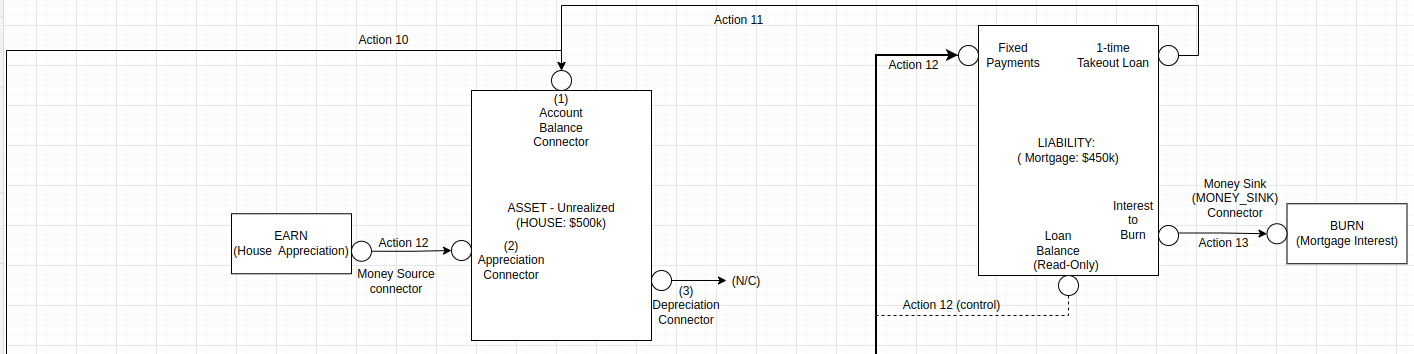
Next up, we look at the House Asset and Mortgage (Liability) accounts. In many ways this is similar to the Car Loan (in terms of Action Line configuration). So I will be a bit more brief in this explanation.
First, The House’s price was 500k, but the loan is only 450k? Where did the other 50k go? This is the down payment. We can configure this down payment as an Action Line from the Chequing account (or some other cash account), to the House account (labelled as Action 10).
Next, for the remaining 450k, we get that money from the Liability:Mortgage Account’s “1-time Takeout Loan” Connector/Port, and connect it to the House Account’s Balance Connector/Port, as the money will be flowing out of the 1-time-takeout Loan port, into the representative value of the House (provided by the Balance Port of the Asset: House Account). We will label this Action 11.
Now, unlike the Car Asset (which depreciates in value over time) our house will likely increase in value as the years go by, so we will need to create an Earn Account (lets call it House Appreciation), and connect its money-source Connector/Port to the Appreciation Port on the Asset House Account (we labelled this Action 12). As previously mentioned, since our house is going to sell for more than we bought it, where we get this extra money is from the buyer, and we represent this extra amount from the buyer using the newly made Earn account.)
Now, in our current scenario planning, we have no real intentions to sell the house (although we can easily adjust this at a later point or in a duplicated scenario), as such we won’t add an Action Line from the House Balance Port to the Chequing Account Balance port (where the money would flow out of the House, due to a sale, and into the Chequing account.) But, as mentioned, adding this Action Line at a later time is easily accomplished.
Next, we look at how the Mortgage Payments get paid. In this financial picture example, its likely being paid out of the Chequing account, so we will add an Action Line from the Chequing Account Balance to the Fixed Payment Port on the Mortgage Liability Account (just like we did for the Car Loan). Let’s label this one: Action 13. It will also benefit from the “(Read-Only) Loan Balance Port/Connector, to indicate when the fixed payment should stop (e.g: when the mortgage gets paid off).
And finally, we need to handle the Mortgage Liability Interest that we have to pay (as part of the fixed payment), that we will never see again. We create a Burn/Expense account and call it “Mortgage Interest”, as we loose this money to interest, never to have it again. Since the interest money to burn flows out of the Mortgage Liabilities “Interest to Burn” Connector/Port down the drain of this new burn account, we must also add an Action line connecting the “Interest to Burn” Connector/Port to the new Burn "Mortgage Interest” account. Let’s label this Action 13.
Here is the picture of what we just described:
Working through the Example: The “Asset: House” Account and “Liability: Mortgage” Account
Working through the Example: The “Liability: Credit Card” and “Liability: Line of Credit” Accounts
Next up, we look at the Credit Card and Line of Credit Liability Accounts. Though these accounts generally represent revolving credit (meaning you can borrow from and pay back these accounts at your discretion), for the sake of building the financial picture we will model these accounts similar as the Mortgage and Car loan Accounts.
Now the credit card account, from an Account Line connection perspective, is the same as the Line of Credit. So we will only describe the credit card account, but will show the picture for both Credit Card and Line of Credit. The real differences between the 2 accounts are the Loan details (interest rates, when we want to pay it back, etc) and the amount/size of the loans. (which we configure in the next page).
Let’s now start with understanding how to account for the balance on the Credit card. We know these card expenses are likely due to regular expenses that have built up overtime on the credit card. An example might be groceries that you purchased on credit at CostCo, to get the CostCo points, or a Vacation Trip (to the Bahamas). In this case, that money will never be coming back to you, so you can tie it to the “Burn General Expenses” Account. To do this you would add an Action Line from 1-time takeout loan Connector/Port to the Burn General Expenses account. Lets label this Action 14 for the Credit card (and Action 15 for the Line of Credit, assuming the Line of Credit borrowed money was also used for general expenses, and not something that retains value [in which case it would need to be tied to that Asset]).
Now, let’s consider how these liabilities are paid for. Just like the other liabilities, we are likely making fixed payments to the liabilities from our Chequing account, so we will need Action Lines from the Chequing account to each of the Liabilities "Fixed Payments” Connector/Port’s. They will also need to be stop-controlled using the Liabilities “Loan Balance” Connector/Port. For credit card we will label this Action 16, and for Line of Credit, we will label this Action 17.
Finally, we need to handle how the interest is accounted for. Just like the other liabilities when the fixed payment is applied, it clears the internally accumulated interest, and “moves it” to the “Interest to burn” Connector port. This port then needs to be tied to a burn account so that this interest money (which will never be seen by you again), can be burned/sent down the drain of the connected Burn account. So we create two Burn accounts: “Credit Card Interest”, and “Line of Credit Interest”, and we connect Action Lines from the “Interest to Burn” Connector/Ports of each liability to their respective Burn account. We label these Actions Action 18 (for the Credit Card Liability Account), and Action 19 (for the Line of Credit Liability Account). The following Picture shows the Credit Card and Line of Credit Liability accounts connected:
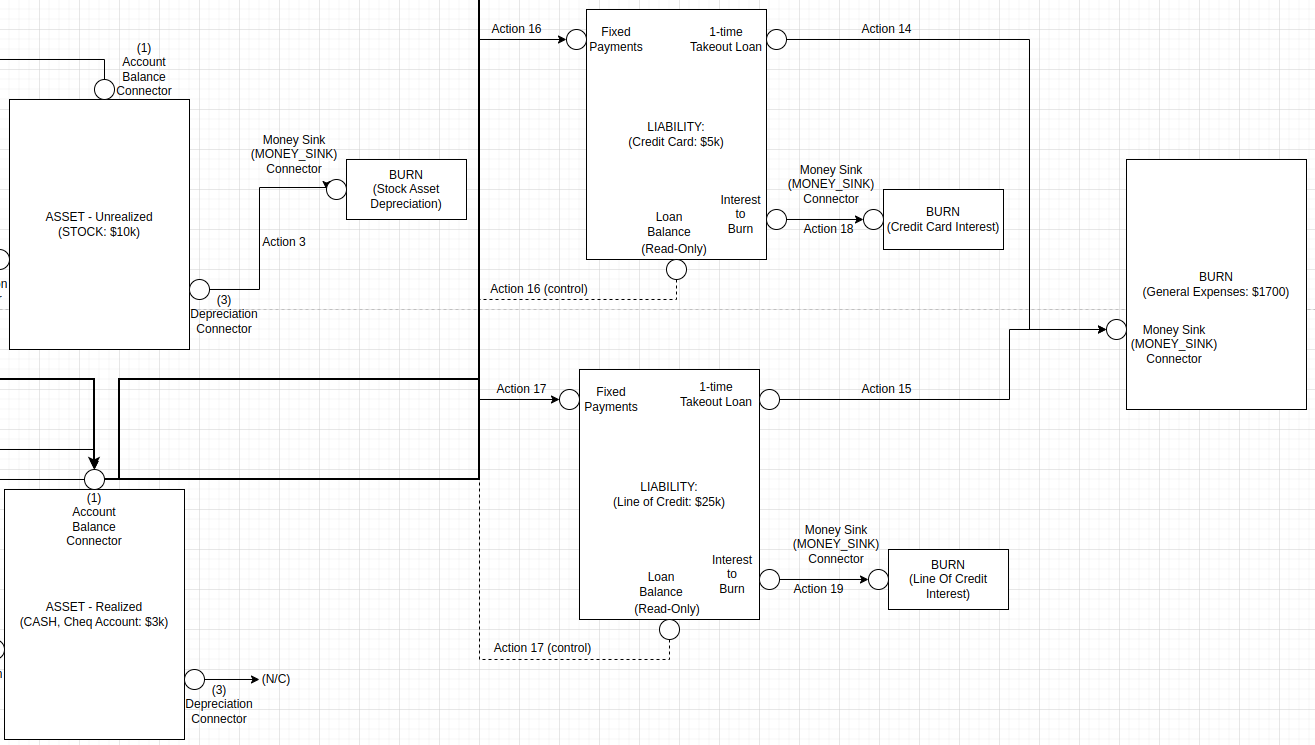
Working through the Example: The “Burn: General Expenses” Account
Finally, we have the General Expenses Account. So far we have shown this Burn account accommodating bulk expenses that were ran up on a credit card and Line of Credit, but we must also accommodate for the recurring monthly expenses, that were mentioned in the original “taking a Tally of Expenses” from Page 1.
Since we summed all the monthly expenses as 1 large monthly expense (1700 per month), we can create a Action Line from the Chequing Account Balance Connector/Port (where the money comes out of, to pay for these expenses) and connect it to this “Burn: General Expenses Account”. If we wanted adjustability in the scenario based on some of the individual expenses, we could create additional Action Lines connecting these 2 described points where each Action Line would be for each expense we might want to adjust. For now, to keep it simple we will only show the 1 “summed up monthly expense” Action Line, and label it Action 20.
Working through the Example: The Final Picture
With this, we can now start making the accounts and action line connections/configurations in WealthNav, so that we can see how our example Life Financial Picture plays out into the future!